 Go to BKOOL
Believe it or not, overtraining is much easier than you think. Piling on the hours of training isn’t always beneficial, and can even lead to problems. Overtraining can become dangerous if not caught in time, often jeopardizing the performance and long term health of many amateur athletes.
We’re going to explain what it is, why it happens, and what some of its symptoms are. This will help you detect it before it’s too late.
What is overtraining?
When you take on a high volume of training, we talk about two concepts: overload and overtraining.
Overload is the abnormally high muscle pain you feel when you don’t recover sufficiently between workouts. It usually appears after several consecutive days of demanding workouts, and also produces a feeling of exhaustion. Fortunately, overload has an easy cure: rest.
When you ignore the signs of overload and don’t slow down, that’s when you’re overtrained. If you continue to train harder after the body shows symptoms of overtraining, all you do is harm yourself.
Overtraining is a serious problem for your health as an athlete, since you may need weeks, or even months, to recover completely and return to your previous level of performance. Overtraining also affects the endocrine system, which is responsible for the hormones that govern tyhings like your mood.
Overtraining can also weaken the immune system, and if not treated in time, it can become chronic.This can be detrimental to long term health and fitness, even for years. That’s why it’s important to know how to modify the intensity of your training.

What are the symptoms of overtraining?
The symptoms of overtraining are numerous and can vary from athlete to athlete. However, the main ones are quite common, appearing in the vast majority of overtraining cases.
Insomnia
You may find it impossible to fall asleep when you need to. This restless feeling may be an indication that cortisone levels are too high. This so-called “stress hormone” often spikes when training is too intense.
Muscle pain that doesn’t go away
Do you feel more soreness than usual? Does your overload go beyond a few hours or a day after a demanding workout? When muscle soreness is constant, it can be a sign that your muscles have failed to repair themselves properly. This is a classic symptom of overtraining.
Performance plummets
There are times when, despite a high level of training, your fitness not only doesn’t increase, but actually gets worse. Your performance decreases and workouts don’t go according to plan. This drop in fitness is a clear sign that something’s wrong and your body is overtrained.
Chronic fatigue
If you’ve been feeling lethargic for several days, pay attention. Fatigue, both mental and physical, is one of the most obvious signs of overtraining.
Low mood or apathy
If you’re not in a good mood, or you’re feeling “down in the dumps”, overtraining may be to blame. As mentioned above, it affects the endocrine system which controls your mood.
Now that you know some of the key symptoms of overtraining, you just need to pay attention to them and be ready to adjust your training if any of them appear. Don’t hesitate to be flexible with your planning if necessary.
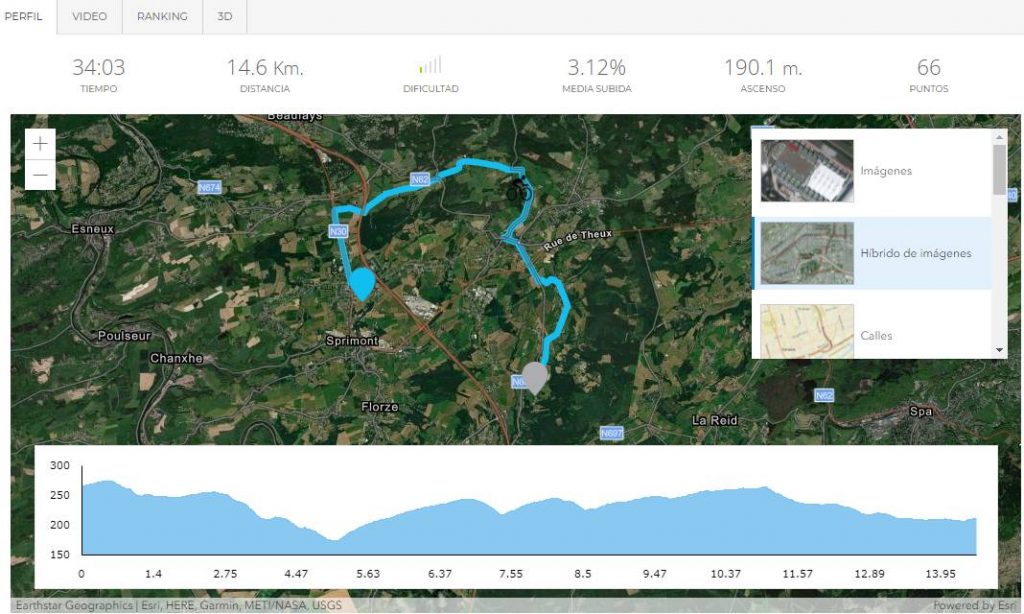
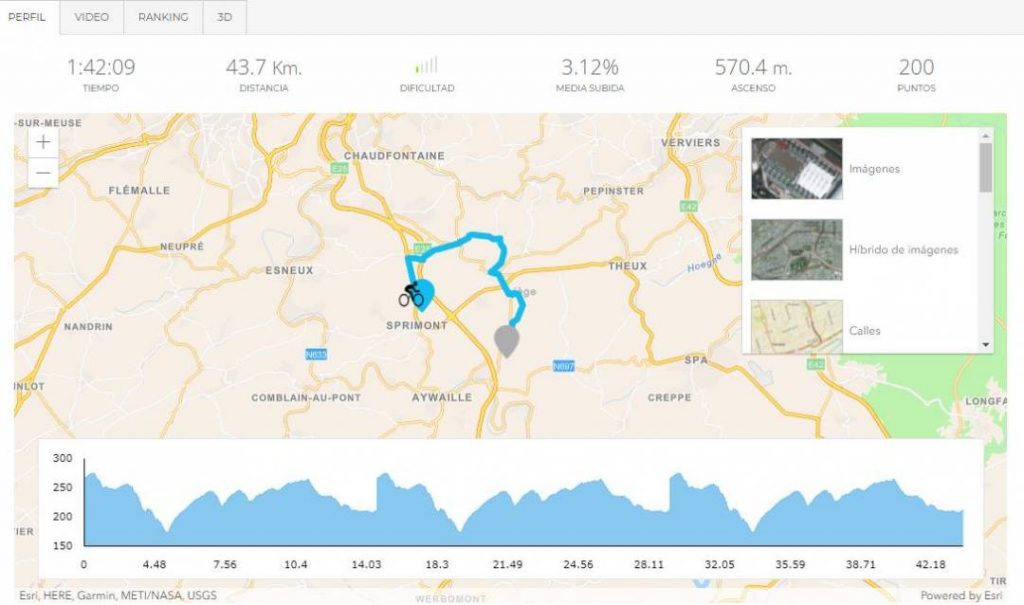
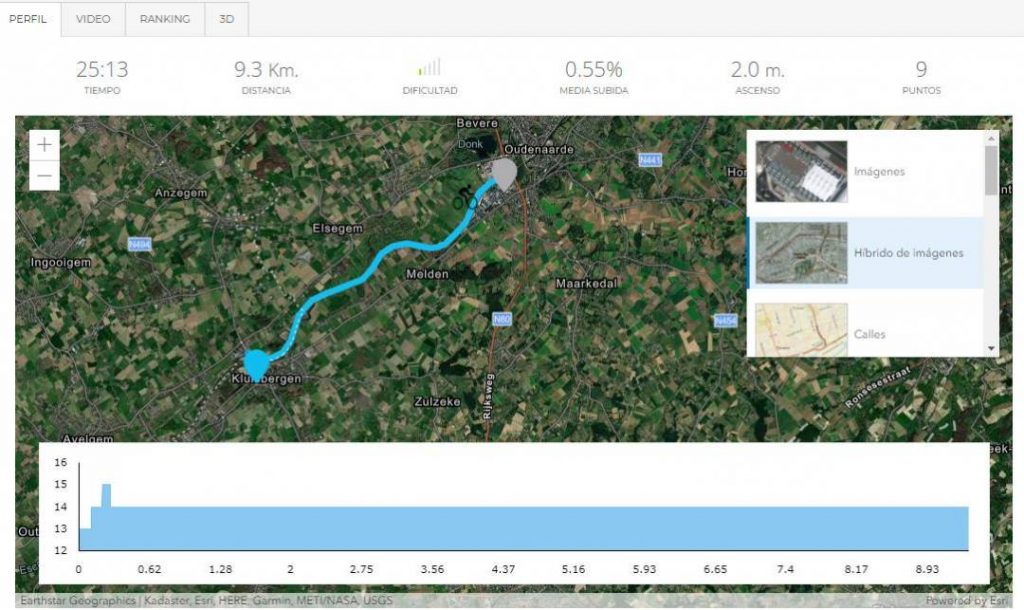
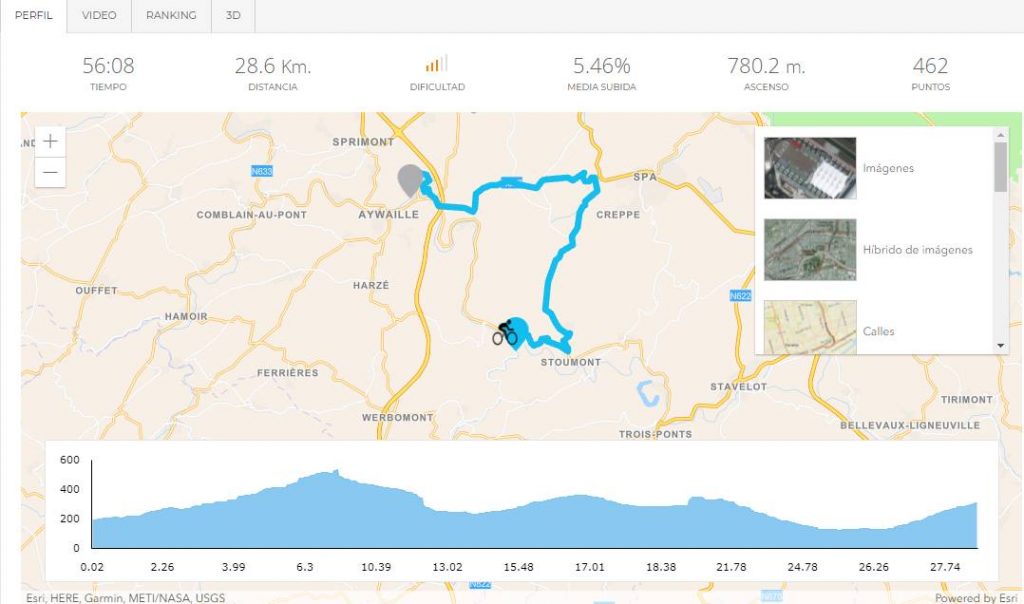
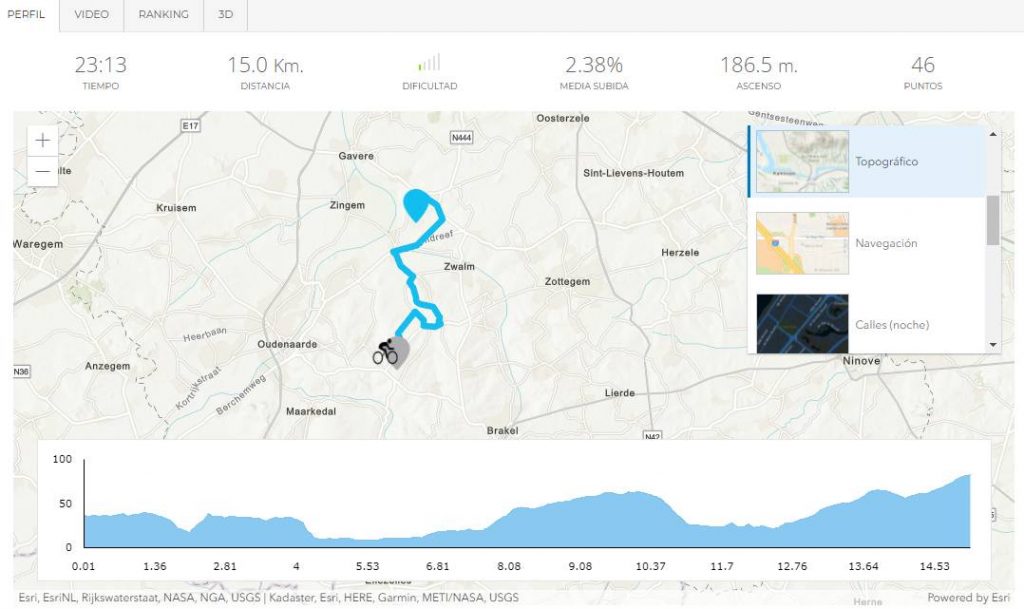
A light workout on BKOOL never hurts.
or not, overtraining is much easier than you think. Piling on the hours of training isn’t always beneficial, and can even lead to problems. Overtraining can become dangerous if not caught in time, often jeopardizing the performance and long term health of many amateur athletes.
We’re going to explain what it is, why it happens, and what some of its symptoms are. This will help you detect it before it’s too late.
What is overtraining?
When you take on a high volume of training, we talk about two concepts: overload and overtraining.
Overload is the abnormally high muscle pain you feel when you don’t recover sufficiently between workouts. It usually appears after several consecutive days of demanding workouts, and also produces a feeling of exhaustion. Fortunately, overload has an easy cure: rest.
When you ignore the signs of overload and don’t slow down, that’s when you’re overtrained. If you continue to train harder after the body shows symptoms of overtraining, all you do is harm yourself.
Overtraining is a serious problem for your health as an athlete, since you may need weeks, or even months, to recover completely and return to your previous level of performance. Overtraining also affects the endocrine system, which is responsible for the hormones that govern tyhings like your mood.
Overtraining can also weaken the immune system, and if not treated in time, it can become chronic.This can be detrimental to long term health and fitness, even for years. That’s why it’s important to know how to modify the intensity of your training.
What are the symptoms of overtraining?
The symptoms of overtraining are numerous and can vary from athlete to athlete. However, the main ones are quite common, appearing in the vast majority of overtraining cases.
Insomnia
You may find it impossible to fall asleep when you need to. This restless feeling may be an indication that cortisone levels are too high. This so-called “stress hormone” often spikes when training is too intense.
Muscle pain that doesn’t go away
Do you feel more soreness than usual? Does your overload go beyond a few hours or a day after a demanding workout? When muscle soreness is constant, it can be a sign that your muscles have failed to repair themselves properly. This is a classic symptom of overtraining.
Performance plummets
There are times when, despite a high level of training, your fitness not only doesn’t increase, but actually gets worse. Your performance decreases and workouts don’t go according to plan. This drop in fitness is a clear sign that something’s wrong and your body is overtrained.
Chronic fatigue
If you’ve been feeling lethargic for several days, pay attention. Fatigue, both mental and physical, is one of the most obvious signs of overtraining.
Low mood or apathy
If you’re not in a good mood, or you’re feeling “down in the dumps”, overtraining may be to blame. As mentioned above, it affects the endocrine system which controls your mood.
Now that you know some of the key symptoms of overtraining, you just need to pay attention to them and be ready to adjust your training if any of them appear. Don’t hesitate to be flexible with your planning if necessary.
A light workout on BKOOL never hurts.
Believe it or not, falling into overtraining is much easier than you think. Accumulating hours and hours of training is not always beneficial and can lead to certain problems. This syndrome, which can become very dangerous if not caught in time, often jeopardizes the performance of many amateur athletes.
So today we are going to explain what it is, why it occurs and what are some of its symptoms so that you can detect it in time.
What is overtraining?
When we face a high volume of training we can talk about two concepts: overload and overtraining.
Overload is that muscle pain that exceeds the normal and that appears when you do not recover enough between workouts. It usually appears after several consecutive days of demanding workouts and also produces a feeling of exhaustion. Fortunately, overload has a great solution: rest.
When we ignore the signs of overload and do not slow down, that is when overtraining appears. If we continue to train harder when the body shows such a weakness, all we do is harm ourselves.
Overtraining is a serious problem for our health as athletes, since we may need weeks, or even months, to recover completely and return to our level. And, beyond the sporting aspect, overtraining also affects the endocrine system, which is responsible for the hormones that govern, for example, mood.
In addition, it can also weaken the immune system and, if not treated in time, it can become chronic and detrimental to health and fitness in the long term, even for years. That’s why sometimes we need to know how to modify the intensity of our training.
What are the symptoms of overtraining?
The symptoms of overtraining are numerous and vary in each athlete, affecting each individual in one way or another. However, some of them are common in the vast majority of cases
Difficulties sleeping
Many times it is impossible to fall asleep when we get into bed. This restless feeling may be an indication that cortisone levels are too high. The so-called “stress hormone” appears when training is too intense.
Muscle pain does not stop
Do you feel more soreness than usual? Does your overload go beyond the hours or day after a demanding workout? When muscle soreness is constant it can be a sign that our muscles have failed to repair themselves properly, one of the symptoms of overtraining.
Fitness plummets
There are times when, despite being subjected to a high level of training, our fitness not only does not increase, but actually decreases. Our numbers get worse and workouts don’t go according to plan. The drop in fitness is a clear sign that we are not doing things right and our body is overtrained.
Chronic fatigue
If your body has been without energy for several days pay attention to all the indicators. Fatigue, both mental and physical, is one of the most obvious signs of overtraining.
Low mood or apathy
If you’re not in a good mood or you’re feeling “down in the dumps”, overtraining may be to blame. As mentioned above, it affects the endocrine system and, therefore, our mood.
Now that you know some of the main symptoms of overtraining, you just need to pay attention to them and, if any of them appear in your day-to-day life, be alert. Don’t hesitate to be flexible with your planning if necessary.
A light workout at BKOOL never hurts.
BKOOL is the most complete cycling simulator on the market, try it FREE for 7 days!