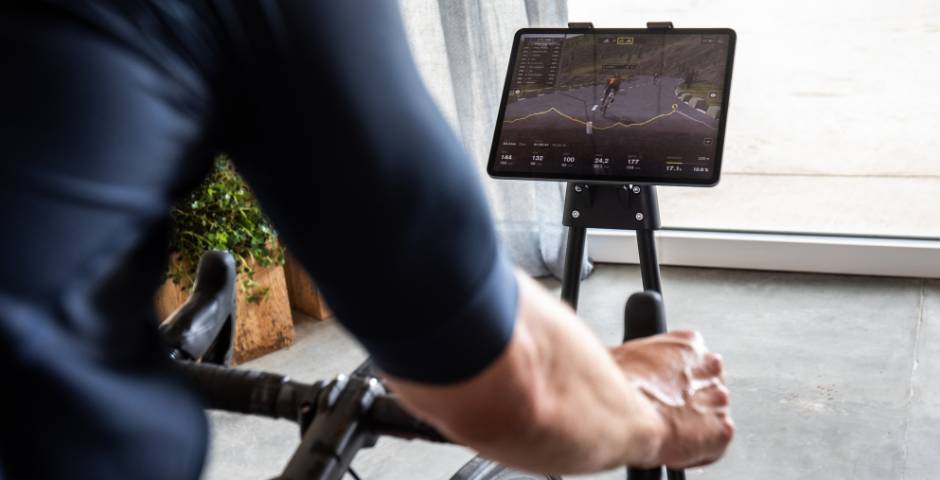
BKOOLers, we are bringing you the latest news about the new version of our cycling simulator. With this new release we have completely changed our pairing system, in order to make things easier for you and to improve the connections with different types of devices.
The major advantage of this new system is that you will be able to access Device Pairing from the simulator’s home screen before starting the session. The pairing system can also be accessed from the top right corner of the screen even during your session, making connectivity easier than ever before. In addition, you can see the connection status of the devices you have paired with the cycling platform at any time with just one click.
An additional feature of this new system is that it brings an improvement in the way results are measured and rankings are displayed. Which in other words can be translated as an improvement in our “anti-cheating” system, which as you can see, we continue to work day after day to make our virtual competitions the fairest and most realistic in the world. The key in this case, is to achieve a better connectivity to offer more accurate metrics.
Along with these improvements, bugs detected by users have also been corrected in order to offer the most realistic indoor cycling experience on the market. Remember that at BKOOL we are always working to provide the best possible service and we take your opinions and suggestions very seriously in order to achieve this.
If you are not yet a user of the platform but would like to try out what it feels like to have thousands of 3D routes and video to ride worldwide, we have good news for you: on our website you can access a BKOOL Premium account free of charge for 30 days!
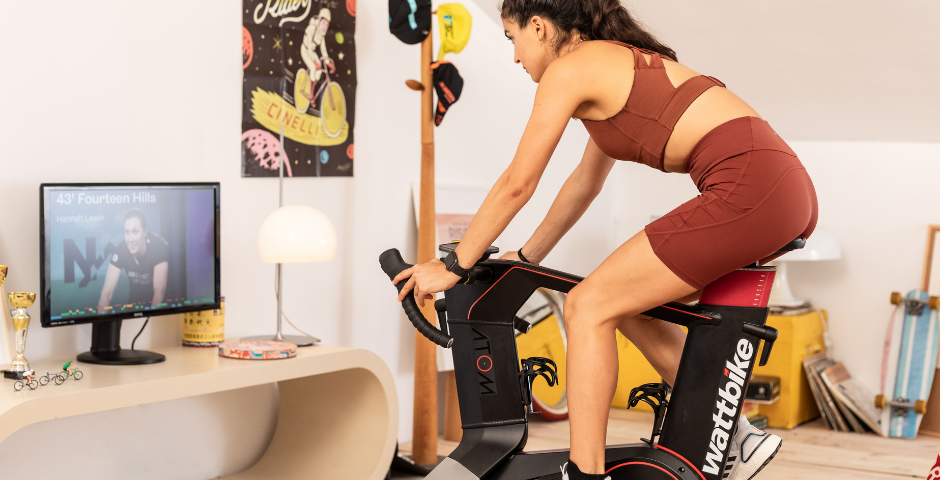
One of the best ways to lose weight is cycling, but how many calories are burned in its indoor version? Today we are going to see how important it is to include a smart trainer session in our routine to maintain and improve fitness and what is its role in the loss of calories.
Indoor cycling in the sports routine
Getting on the smart trainer and pedaling for at least 45 minutes is something which brings about a number of benefits, which ones? The following:
Strengthens muscles
Indoor cycling strengthens the muscular tissues of the body involved in the movement. Mainly the legs and glutes are favoured the most, but the upper area such as abdomen, back, arms and shoulders are also benefited in this exercise.
Improves health
The smart trainer is one of the best ways of taking care of your health. In addition to the fact that it is intended to be used by the whole family, being, thus, affordable for anyone, indoor cycling offers improvements such as:
– Controlled blood pressure.
– Reduction of glucose intolerance.
– Reduction of toxin levels.
– Stability of triglyceride and cholesterol levels in the blood.
Favours a sense of well-being
A session on the smart trainer not only involves great benefits to the body and health of the body, but also positively affects our mind and mood. Pedaling is a liberating sensation that reduces stress and the accumulation of anxiety generated by daily tasks. A workout on the smart trainer promotes a sense of well-being. It also improves the quality of sleep, which also influences our mood.
Helps burn calories
As we have already mentioned, indoor cycling is an effective method for losing calories. Depending on the intensity of the workouts, you can get to burn a good amount of calories, which means a better metabolisation of the fats consumed. In the long term this means a decrease in the level of fat retained in the tissues.
Picture: BKOOL
Indoor cycling and calorie burning
Indoor cycling ensures a fast and efficient weight loss. In the same way, an accelerated process of definition is also carried out due to the effort in the training sessions, since the smart trainer involves the work of a large number of muscle fibers.
The simulation of intervals on flat roads, hills, sprints, cadence control and power are some of the advantages that the BKOOL simulator offers, in addition to personalised classes. These adjustable sessions are perfect for breaking a sweat, releasing tension and burning calories, but how many calories are burned in a smart trainer session?
How many calories are burned with indoor cycling?
Undoubtedly, this is one of the most common questions which interest athletes who want to lose weight. Fat loss and muscle toning are common goals that are achieved on the smart trainer, so calories play an important role.
The actual number of calories burned with indoor cycling depends on several factors, including the individual’s weight, the duration and intensity of the session, environmental conditions, etc.
However, it can be estimated that calorie loss ranges from 400 to 1000 calories per hour. This is a very striking and attractive calorie burn, even more so when we sometimes use the smart trainer for more than an hour.
Other studies state that a 45-minute indoor cycling session can burn between 500 and 800 calories.
According to Harvard University, riding the smart trainer at a moderate speed – 19.3 to 22.3 kilometers per hour – will cause a 70-kilogram person to burn 298 calories in 30 minutes. At a faster pace – 22.5 to 25.5 kilometers per hour – a person of the same weight will burn 372 calories.
As for a person weighing 56.7 kilograms, the loss at a moderate pace is estimated at 210 calories.
This figure depends on each person’s body and the type of training and intensity selected. The calories burned with indoor cycling are very changeable, but effective.
In short, the benefits of the smart trainer are both physical and mental and its role in weight loss is fundamental, since it involves the effort of several muscle groups. The number of calories burned is considerable and makes indoor cycling a perfect way to meet this objective.
BKOOL is the most complete cycling simulator on the market, try it FREE for 7 days!
Carbohydrates are our main source of energy for carrying out physical exercise. Although they are defined as a fundamental nutrient for any athlete’s diet, whether amateur or professional, there is a great variety of theories about the moment to consume them: before or after training? Today we are going to solve it.
Why are carbohydrates so necessary?
First of all, it is important to understand why these macronutrients are indispensable in an athlete’s diet, despite their detractors.
The mandatory presence of carbohydrates in the daily intake is due to the benefits they offer:
Provide energy to meet the increased energy demand.
Optimise glycogen deposits.
Favour muscle recovery after physical activity.
Configured as a source of energy during training and competition.
Quick and easy source of energy between meals to maintain blood glucose levels.
For these reasons, it is recommended that carbohydrates occupy between 55 and 60% of the daily caloric intake. This percentage is easy to achieve by averaging four daily servings of carbohydrate-rich foods.
Bread, cereals, milk and its derivatives, different types of pasta and fruit are examples of foods rich in carbohydrates that you can consume in the indicated proportion.
Carbohydrates: before or after training?
To be straightforward, it is best to consume carbohydrates before training. Different doctors and nutritionists consider this to be so. Why? The answer is simple. These foods provide a large amount of energy. If they are consumed before training, the muscles will use all that energy to perform the physical exercise at thehighest level.
Basically, the idea is to provide the muscles with the necessary energy, not only so that they are capable of enduring the workout, but also so that they can do so while performing at the highest possible level.
However, this carbohydrate intake must come from complex carbohydrates (starches) and natural sugars instead of processed and refined sugars.
Carbohydrates also after training
Although it has been pointed out that it is more appropriate to consume carbohydrates before exercising to provide sufficient energy, it is also advisable to ingest them afterwards.
The body has used up glycogen stores during physical exercise and it is necessary to replenish them in order for the body to function at its best. Within 40 minutes after training, experts recommend eating simple carbohydrates to provide an immediate source of energy substrate to the muscle cells so that they can begin an effective energy recovery.
Picture: BKOOL
What foods to eat after training?
In addition to properhydration with water, isotonic drinks or fruit shakes, which we have already discussed at BKOOL, it is advisable to eat a large amount of protein and carbohydrates.
Some athletes opt for a quick digestion and drink drinks rich in carbohydrates. Other alternatives are fruit, rich source of simple carbohydrates, cerealbars or nuts. The latter are very nutritious options and ideal for recovering reserves.
Protein is also important for replenishing energy. Tuna, vegetables, yogurt or banana are some foods suitable for after training.
Some experts have indicated that the rate of muscle glycogen recovery is four times higher if carbohydrates and protein are combined than when either nutrient is administered separately.
Conclusions
There should be no doubt that carbohydrates should be part of your diet. Now, to organise your eating habits you must take into account what we have explained:
– Before training: complex carbohydrates.
– After training: simple carbohydrates and protein.
If you are going to do a long and intense training, it is also appropriate to include carbohydrates during exercise. Don’t forget to grab an energy bar before you get on the smart trainer and start your BKOOL session.
BKOOL is the most complete cycling simulator on the market, try it FREE for 7 days!
Vacations are a perfect time to rest, relax and disconnect from the daily routine. This sometimes means putting sport to one side. Therefore, returning to training after this break is not easy.
Getting back into the sporting routine, regaining fitness and getting back into the habit of training can be complicated. However, at BKOOL you have classes and training sessions adapted to your level that will help you to return to physical activity progressively without it being torture.
Tips for getting back to training after the vacations
To returning to training is important to start with adaptation routines in which the exercises should have a lower intensity than what you are used to. However, this is not the only recommendation. Here we leave you more tips for your return to the smart trainer:
Stretching and warm-up sessions
It is important not to force your muscles or demand too much from them after a break, as you may run the risk of injury. Training should be done gradually so that your body can get used to it again.
To do this, you can do long, intense warm-up and stretching sessions. This way you prepare your muscles properly for the exercise that will follow.
It is a slow, but effective way to get your body and muscles warmed up and ready for subsequent workouts.
Don’t do your usual workout on the first day
You’ve stretched and warmed up and it’s time to start training. Don’t make the mistake of wanting to go back to where you left off before your vacation.
If you have been on hiatus for a while it is advisable to do gentle and progressive training, so do not try to do your usual routines as soon as you get back on the smart trainer. Choose simple routes with which you can train without fear of needles.
Reduce the cadence and duration of the session. A more moderate speed and a shorter time will help you avoid the stiffness that comes with returning to exercise. So, whatever your usual training is, try to make the first few days much more gentle and relaxed than what you are used to.
Set realistic goals
You have to be aware that if you have not trained for several days or even weeks you are not going to maintain the same physical shape. You can’t come in on the first day and ride for two hours with the same power you had before the break.
Therefore, try to set goals that you can meet on the first few days. Set yourself demanding and motivating challenges, but ones that you can achieve and that will help you progress. This way you will be more motivated and you will progress faster until you recover, or even improve, the physical form you had.
Picture: BKOOL
Don’t overtrain
The desire to make up for lost time can play a dirty trick on you. Training for too long and not respecting rest periods is a very common mistake that can sometimes lead to injury or muscle pain.
Be patient. Try to train in moderation: resting and recovering 100%. You should always keep this advice in mind. A good rest and a correct recovery is essential to achieve maximum sports performance.
Take care of your diet and make sure it is balanced
During the vacations it is normal to neglect your diet and, consequently, gain some weight. But don’t let this discourage you, get back on the smart trainer and combine sports practice with a good diet.
A balanced diet includes fish, vegetables, meat, legumes and drinks such as water, fruit shakes or isotonic drinks. In this way it will be easier for you to get in shape and you will perform at a better level.
The supply of the necessary nutrients and the activation of the body is enough for you to recover your physical condition soon. Enjoy cycling and cycling routes all over the world while improving your performance.
Conclusions
Returning to training means resuming exercise gradually and calmly without pushing yourself more than you should. You must be patient and not try to recover the routine in two days, as it will only lead to injuries or muscle aches.
The combination of sports practice and healthy diet is the key to maintain the physical performance before the vacation period. Don’t be discouraged because you have lost endurance, get on the smart trainer and give those legs a workout!
BKOOL is the most complete cycling simulator on the market, try it FREE for 7 days!
Who hasn’t thought about doing the Camino de Santiago? BKOOL makes it easier than ever by including up to 26 stages of this route so that you can also do it on your smart trainer.
Which stages of the Camino de Santiago can I do?
BKOOL has 26 stages of this mythical route so that you can enjoy it from home and on the smart trainer. These routes, with 3D, 2D and even video format, will be very entertaining and motivating to get to the cathedral of Santiago itself!
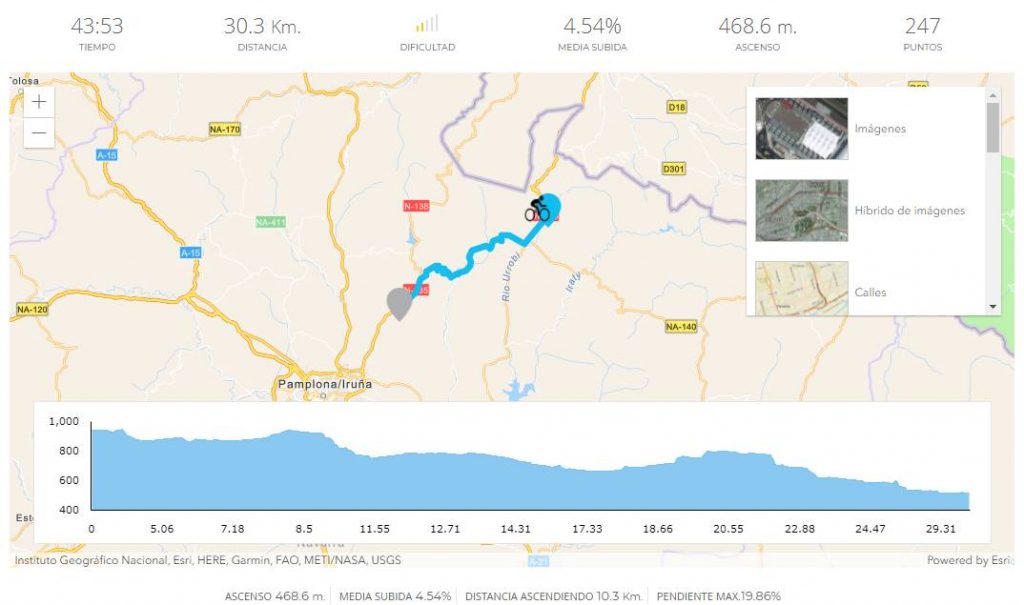
Stage 1: From Orreaga/Roncesvalles to Esteribar
This first stage is based on the 30.3 kilometres route that links the village of Orreaga and Esteribar. The ascent of the route is slight, with only 468.6 metres of gradient. It is a first contact stage that lasts around 43 minutes and can be enjoyed in 3D format.
Picture: BKOOL
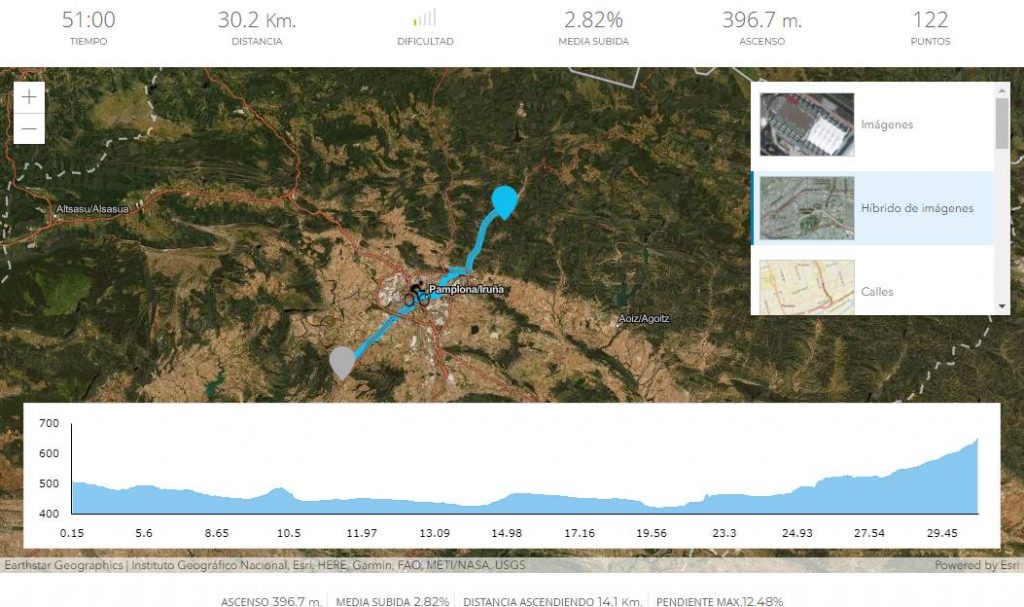
Stage 2: From Esteribar to Basongaiz
With a lower difficulty, but a similar distance (30.2 kilometres), the route from Estibar to almost Basongaiz, passing through Pamplona, is the second stage of the Way of St. James. For 51 minutes you can enjoy this stage in 3D.
Picture: BKOOL
Stage 3: From Basongaiz to Estella-Lizarra
Still in Navarre, this third stage is 30.4 kilometres long and takes an estimated time of 52 minutes. Starting a little before the village of Basongaiz, this route takes us gradually towards the border with La Rioja.
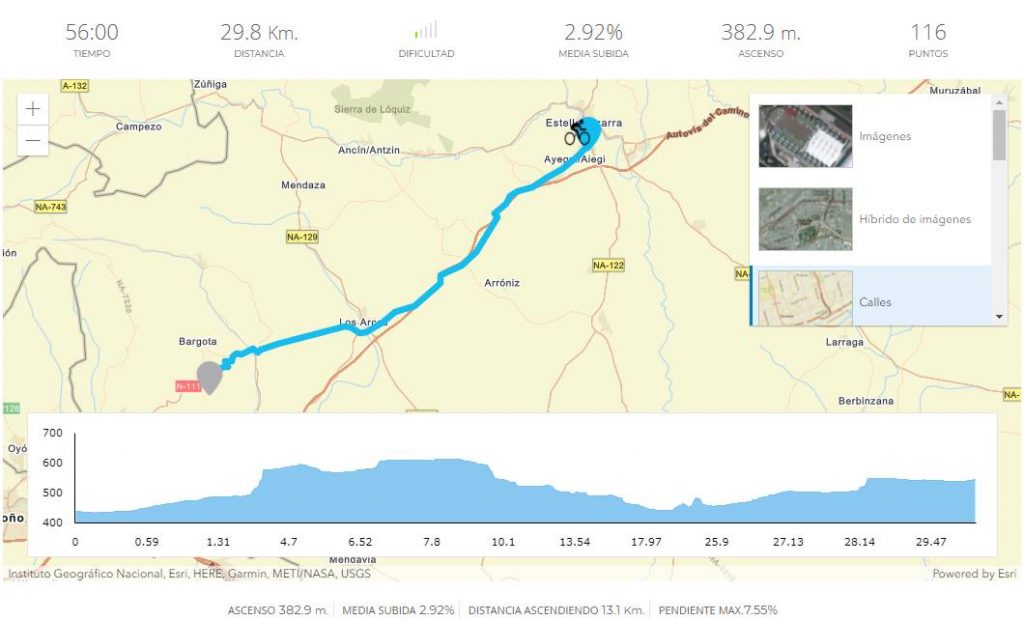
Stage 4: From Estella-Lizarra to Torres del Río
Continuing in Navarre, this 29.8 kilometresroute can be covered in 56 minutes. This stage continues the previous route finished in Estella-Lizarra, reaching an intermediate point between the villages of Torres del Rio and Viana.
Picture: BKOOL
Stage 5: From Torres del Río to Navarrete
This route starts at an intermediate point between Torres del Rio and Viana. It is a total of 30.2 kilometres, estimated in a time of 53 minutes, passing through the city of Logroño. With only 265.2 metres of ascent and a 3D version, this route crosses the border between the two communities.
Stage 6: From Navarrete to Hervias
In La Rioja, this 30.1 kilometresroute can be completed in one hour, without any difficulty, as the ascent is 395.1 metres. Passing through the villages of Tricio, Najer and Hormilla, this stage starts in Navarrete and finishes almost at Hervias.
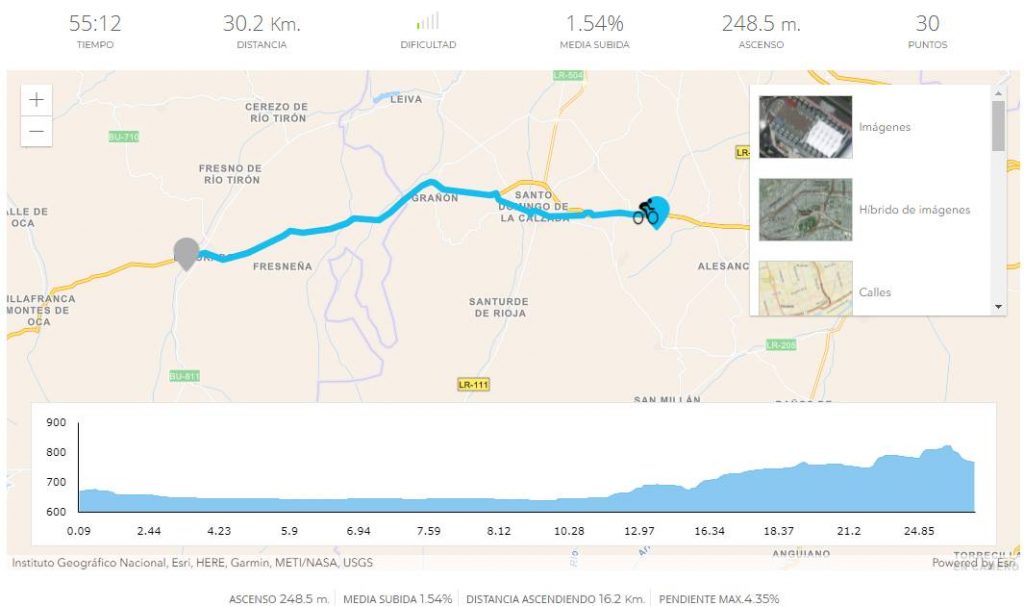
Stage 7: From Hervias to Belorado
Continuing from the same point where the previous stage ended, this new one has another 30.2 kilometres, although the estimated time is reduced to 55 minutes due to its greater ease. It can be enjoyed in 3D format, this continuation of the Way of St. James ends in the province of Burgos.
Picture: BKOOL
Stage 8: From Belorado to Ibeas de Juarras
The eighth stage takes place entirely in the province of Burgos, starting in Belorado and ending in Ibeas de Juarras. 30.3 kilometres that are covered in almost 50 minutes and with an ascent of 408.3 metres. More than 480 people have already ridden this route.
Stage 9: From Ibeas de Juarras to Las Quintanillas
This is a great route, starting in Ibeas de Juarras and finishing in Las Quintanillas, passing through the city of Burgos. A very entertaining route of 30.3 kilometres that can be done in 50 minutes. The difficulty is very low, as it is only 110 metres of ascent.
Burgos
Stage 10: From Las Quintanillas to Padilla de Abajo
This is the last complete stage in Burgos. From Las Quintanillas to Padilla de Abajo you cover a total of 30.6 kilometres in about 50 minutes. Very easy to do, with only 166.4 metres of ascent, another province covered!
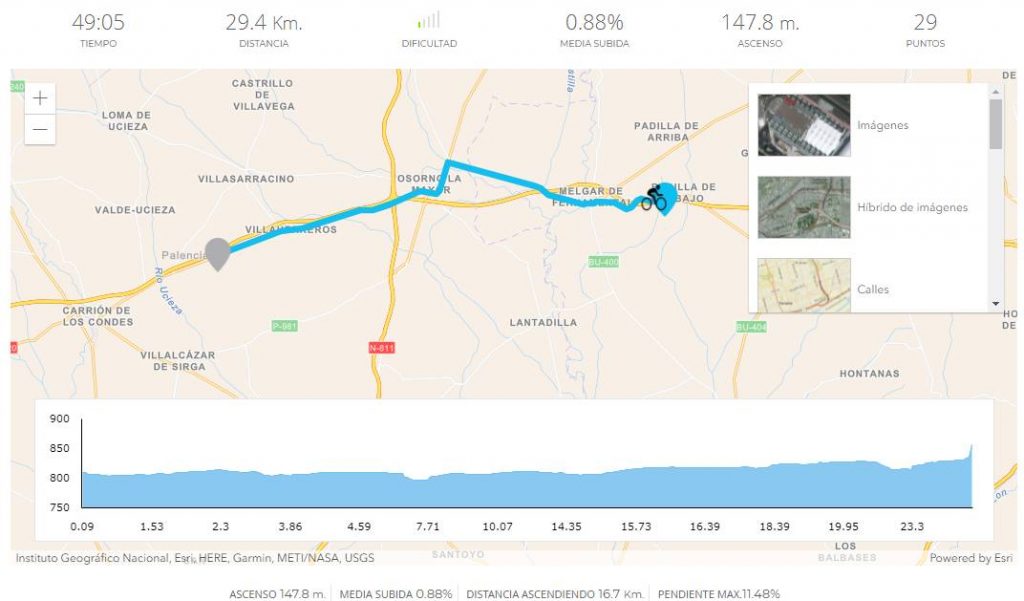
Stage 11: From Padilla de Abajo to Villaherreros
Starting in Burgos and finishing in Palencia. From the village of Padilla de Abajo to Villaherreros, this new stage of the Camino de Santiago is reduced to 29.4 kilometres. In about 50 minutes you can complete this eleventh stage that brings you closer and closer to Galicia.
Picture: BKOOL
Stage 12: From Villaherreros to Calzadilla de la Cueza
At an intermediate point between Villaherreros and San Mamés de Campos, you have the start of this 30 kilometresroute that reaches Calzadilla de la Cueza. In less than 44 minutes you can cover the entire section in the province of Palencia.
Stage 13: From Calzadilla de la Cueza to Bercianos del Real Camino
Returning to the route left behind, the route starts from Calzadilla de la Cueza and almost reaches the village of Bercianos del Real Camino. In these 30.8 kilometres you pass through the villages of Ledigo, Terradillos de los Temi Larios, Moratinos, Sahagún and Calzada del Coto. It is almost 48 minutes with 177.7 metres of ascent.
Stage 14: From Bercianos del Real Camino to Mansilla de las Mulas
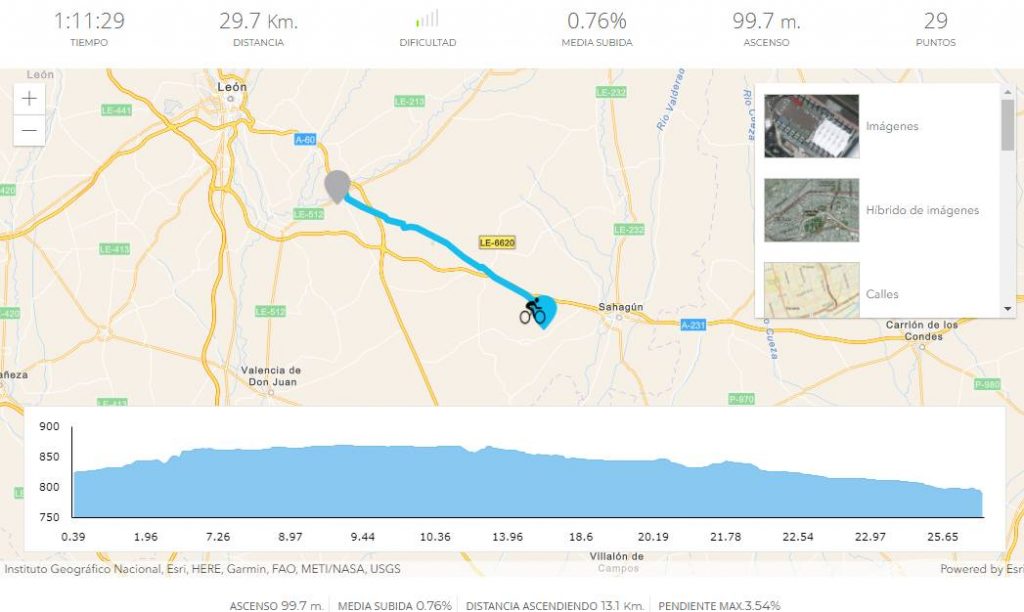
This stage crosses the border with Leon and finishes in the village of Mansilla de las Mulas. A route of 29.7 kilometres with an estimated time of one hour and 11 minutes. Arriving in the province bordering Galicia, you can enjoy this stage in 3D.
Picture: BKOOL
Stage 15: From Mansilla de las Mulas to Robledo de la Valdoncina
A stage of 31 kilometres passing through the city of Leon. For about an hour you pass through villages such as Villamoros de Mansilla, Villaturiel, Arcahueja, Valdelafuente, Puente del Castro, La Virgen del Camino and Valverde de la Virgen.
Catedral de León
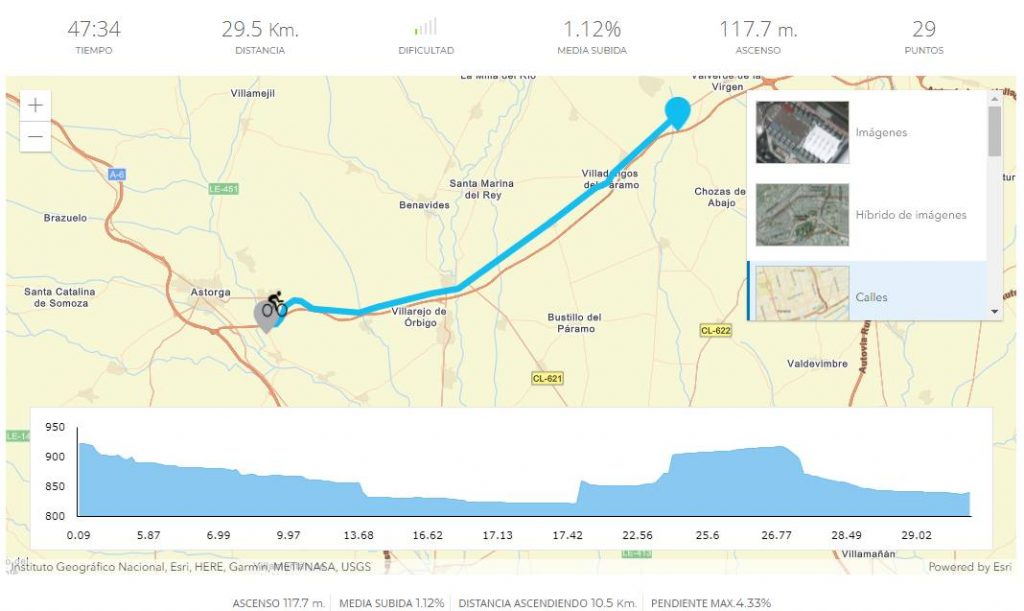
Stage 16: From Robledo de la Valdoncina to Astorga
A total of 29.5 kilometres through different villages in Leon, such as Urbanización Camino de Santiago and Villadangos del Páramo. It ends in Astorga, which you can reach in almost 48 minutes.
Picture: BKOOL
Stage 17: From Astorga to Foncebadon
This is a 30 kilometresstage through the province of Leon that can be completed in approximately one hour and15 minutes. Its journey time is longer due to the number of metres of ascent: 655.9. The route passes through Santa Catalina de Somoza and Santa Colomba de Somoza.
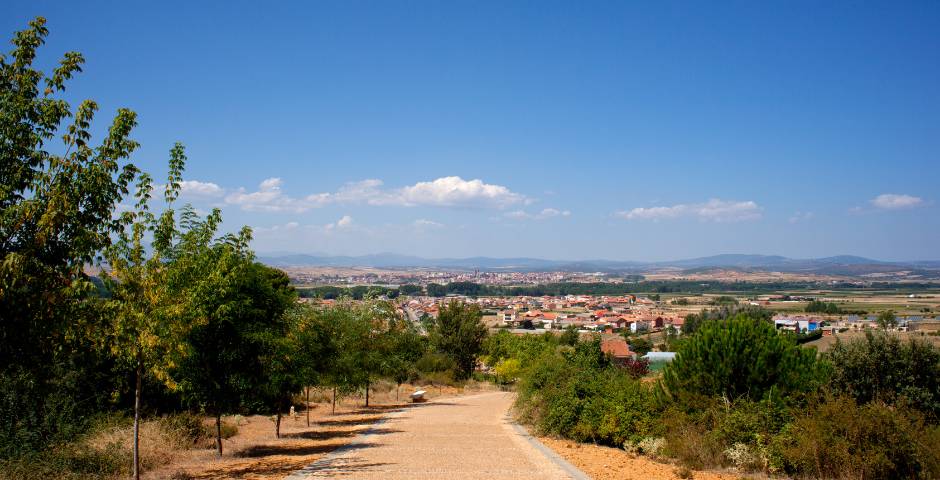
Astorga
Stage 18: From Foncebadon to Ponferrada
This route starts a little before the village of Foncebadon, reaching Ponferrada and bringing you closer to Galicia. It is one of the most typical routes of the Way of St. James. Keeping the distance of 30 kilometres, it can be done in one hour and five minutes. It is an easy route with only 311.3 metres of ascent.
Stage 19: From Ponferrada to Trabadelo
Still in Leon, the route starts in Ponferrada and ends in Trabadelo. It is a route of 30.2 kilometres, which can be completed in 53 minutes. Being very entertaining and easy to do, it will make you enjoy yourself on the Smart trainer, while you get your legs ready.
Stage 20: From Trabadelo to Hospital
Already in Galicia! This route starts in Trabadelo and ends in Hospital, a village in the province of Lugo. There are 29.9 kilometres to cover in one hour and 15 minutes. The longer time is due to the 865.2 metres of ascent.
Picture: BKOOL
Stage 21: From Hospital to Castroncan
In Galicia, from Hospital to the Castroncán area, this 30-kilometre route has a 3D version. It is an easy route with only 348.9 metres of ascent that takes 46 minutes to complete and has already been tried by more than 680 users.
Stage 22: From Castroncan to Seoane
Another stage towards the Cathedral of Santiago. There are 30.2 kilometres in which, during 58 minutes, the route goes through the villages of Fontao, Sarria, Cimadevila (Vilaragunte), Paradela, Castro, Igón and A Reguenga. With 419.7 metres of ascent, this new route is very entertaining.
Stage 23: From Seoane to San Pedro
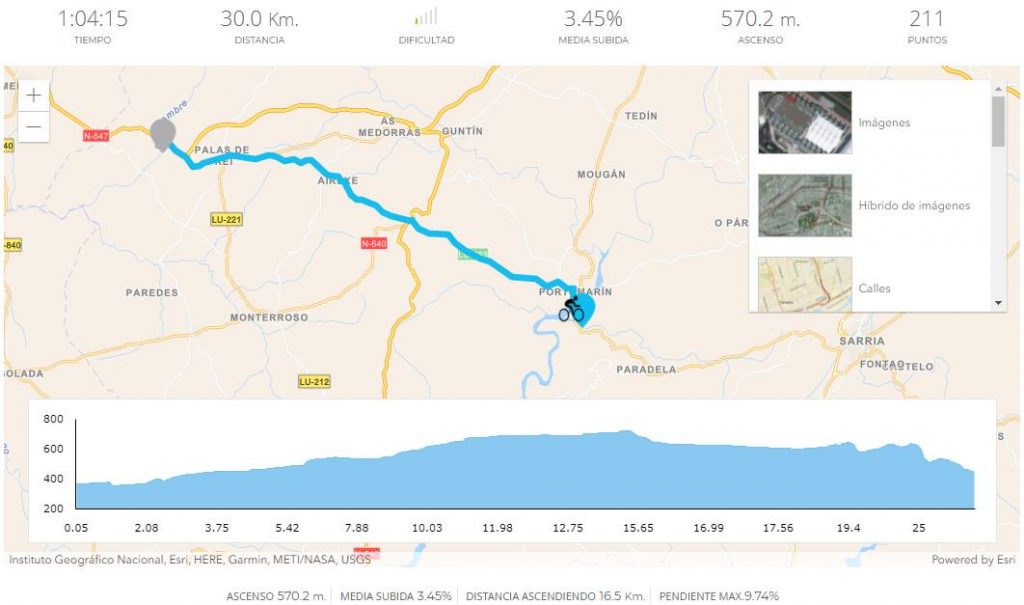
From Seoane to San Pedro, this 30-kilometreroute takes one hour and four minutes. It passes through the villages of Portomarín, Toxibó, Cabanas Do Monte, Gonzar, Castromaior, Ventas de Narón, Os Lameiros, Ligonde, Airexe, Reboredo, Lestedo, A Brea, As Lamelas, O Rosario and Palas de Rei. It is a section that can be seen in 3D and that leads little by little towards the capital of A Coruña.
Picture: BKOOL
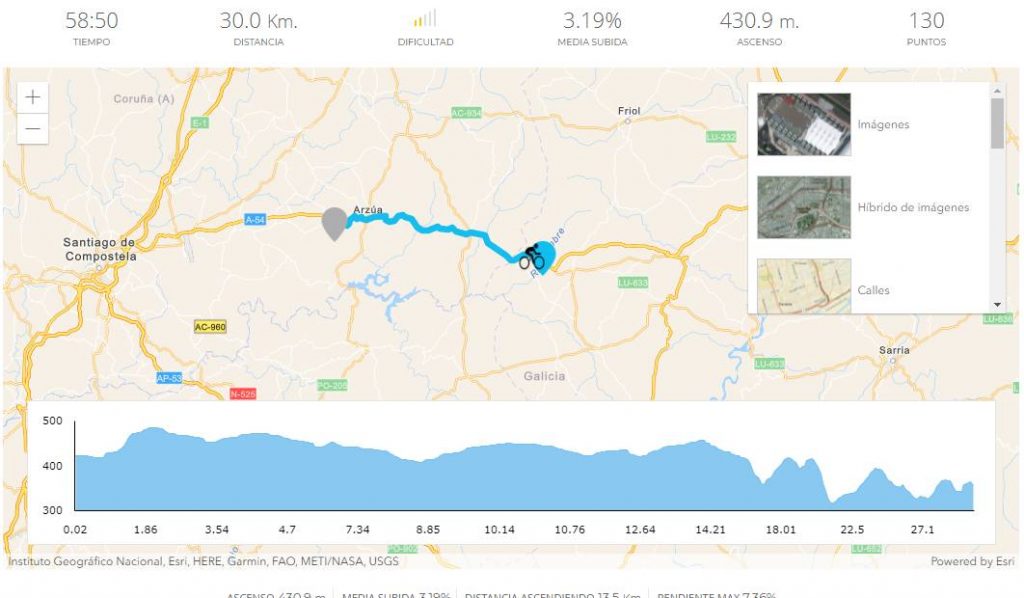
Stage 24: From San Pedro to Penedos
Exactly 30 kilometres of route between San Pedro and Penedos, which means that the route ends in the province of A Coruña. In almost 59 minutes you will climb an ascent of 430.9 metres. Try it and try to overcome the points that more than 460 have done.
Picture: BKOOL
Stage 25: From Penedos to Xan Xordo
Penultimate stage of the Way of St. James. Another 30.3 kilometres with 333.8 metres of ascent that can be covered in one hour and 13 minutes. It maintains a minimum difficulty so you can train without suffering.
Stage 26: From Xan Xonxo to Santiago de Compostela
The last route, very short and easy. In 8.6 kilometres and only 35 minutes you can walk this last stage of the Camino de Santiago that ends in the Cathedral itself. A simple, but fun route with which you will finish this typical route.
Santiago de Compostela
You no longer have any excuse not to do the Camino de Santiago. In BKOOL you have from the first to the last stage you need to travel north towards Galicia. Enjoy and have fun with them!
BKOOL is the most complete cycling simulator on the market, try it FREE for 7 days!
One of the most recurrent debates in the world of cycling is whether or not to train by power. The use of power meters is becoming ever more frequent, as watts have become a big part of the planning of cycling sessions, but what if I train without looking at the watts? Let’s take a look at this question.
Training without looking at the watts
If you decide to train without looking at power, you will be training classically, by heart rate. This method seems to be losing ground in the cycling world, however, there are still many electronic devices that monitor heart rate.
Advantages and disadvantages of classic training
What are the advantages and disadvantages of heart rate training? Here they are:
Advantages
Accessibility
The main advantage of heart rate training is the greater accessibility of the devices. A power meter is around 300-400 euros, while a heart rate monitor or smart watch is much cheaper. The price is much lower.
Fatigue monitoring
With a heart rate monitor it is much easier to detect excessive fatigue or overtraining. If your heart rate is not close to your maximum heart rate, you need to rest.
Disadvantages
Influence of external factors
Conditions such as lack of sleep, high or cold temperatures, illness, etc. influence the value given by the pulse rate. It is therefore not a 100% reliable indicator.
Less control of effort
Training by heart rate makes it difficult to manage your effort. It is difficult to perform a series at a constant pace. Usually, seconds of work are lost because the pulse rate takes time to rise and fall.
Why do we now train by watts?
Until now, heart rate was the basic reference for measuring effort on the bike. However, power has become more accurate and allows you to precisely regulate your efforts in order to fine-tune and thus achieve your goals. The advantages of training by watts are as follows:
–No external or internal influences
Power is nothing more than the work you do based on the force you offer to the pedals and cadence, therefore, it is not conditioned by external factors. In the same way, it is not affected by internal situations such as dehydration, lack of training, tiredness, etc. as is the case with heart rate.
–Better effort management
Training by power helps you manage your effort, which means you can be at maximum performance without having to pay for it later. Setting the intensity which you can ride at without being too tired afterwards is an advantage for many athletes, especially triathletes.
-Personalised training
Having power as a benchmark provides a variety of objective data that allows you to know your fitness level. This is an advantage when programming sessions in the BKOOL simulator, as you can design your training based on this information. The exercise will now be personalised.
Picture: BKOOL
How to train by watts?
Starting to train by power is not such a simple task. The transition from a classic training by heart rate or a session by power implies a certain calmness to avoid risks of injury and an excessive alteration in the sports plan.
The first thing to do is a strength test, a watts test, why?
– To make sure that we are in optimum physical condition.
– To define our training zones.
Watt test
With the watts test we will know our aerobic and anaerobic thresholds and the different power intervals according to which we can train the different physical capacities (power, resistance, speed, etc.).
In other words, with this type of test we calculate our FTP (Functional Threshold Power). The most widespread test is the 20-minute test, consisting of intervals of: maximum effort – recovery – maximum sustained effort – moderate exercise.
These intervals are used to obtain an average watts that must be multiplied by a correction factor of 0.95 to give the watts threshold value. Another valid test is the Ramp Test, which we have already discussed.
Conclusion
Either method is not mutually exclusive. You can try both techniques and choose the one that best suits your goals. If you want to train more accurately to maximise your performance, watts training would be the most suitable. But, if you want to monitor your training at a lower cost and with a traditional method, a heart ratemonitor will be your ally.
BKOOL is the most complete cycling simulator on the market, try it FREE for 7 days!
Recovering from an injury requires patience and time. In this situation, it is essential to resume sport progressively, getting back to habits gradually and without rushing. When dealing with such a recovery, the smart trainer and its customised training designs are the best companion, but how much smart trainer should I incorporate at this stage? Let’s take a look at it now.
First phase after injury
An injury, however slight, requires a recovery period to return to the sporting level previously maintained without running the risk of relapse. This return must be done carefully and calmly, being aware that an acceleration in training can set us back.
For the first few days, it is advisable to do basic exercises that are not too demanding on the muscles. For example, stretching, walking or even swimming are a good alternative.
Injury control, back on the smart trainer
After this initial contact, the duration of which will depend on the severity of your injury, you can get back on the smart trainer to continue your recovery. In this recovery phase, indoor cycling is the best alternative.
When recovering from an injury, the physical benefits of smart trainer are many: improving the cardiovascular rhythm, burning calories in less time and adaptating the muscles to more intense training.
The return to smart trainer, as we have already pointed out, involves a gradual return to a much slower and more controlled pace. It is important to point this out once again, as otherwise you may suffer a muscle strain or soreness.
How much time should be spent on the smart trainer when recovering from injury?
So, when recovering from injury, how long is it advisable to train on the smart trainer? If it is usually advisable to train for around an hour and a half -15 minutes rest-, the most appropriate thing to do in this situation is to reduce the duration to 30-45 minutes on the smart trainer, depending on how you feel.
The time depends mainly on your physical condition. The condition of your muscles, fatigue and post-workout recovery will guide you in this phase. However, if after half an hour of exercise you start to feel too tired or sore, don’t push yourself and stop. Forcing yourself to continue will only delay your recovery.
It is also essential to manage your breaks correctly. If this is important in a regular session, it is even more so after an injury. This is why the 15 minutes of rest can even be increased if necessary.
What level of intensity is recommended on the smart trainer?
In addition to the duration of the workout, intensity is another key factor in the recovery session.
Experts recommend knowing your own limit when cycling on the smart trainer. This advice should always be followed both in the design of training sessions aimed at improvement and progress, and in recovery sessions after an injury.
It is therefore essential to know how far we can go in the exercise without running the risk of re-injury. To do this, when returning to the smart trainer, it is common to reduce the intensity of the exercise. It is not necessary to reduce it too much, because then you will not achieve the results you want.
Picture: BKOOL
So, what level of intensity do I train at on the smart trainer? Design a session with the necessary resistance to exert force on the pedal, but without experiencing pain during the exercise.
You can programme intervals of increasing and decreasing intensity to test your progress. Alternate the intensities and you will find out how you are doing on the smart trainer. It is advisable to always start with a gentle warm-up – low intensity – and then continue with higher resistance. When your body asks for it, reduce the intensity again.
There is no specific intensity, it depends on the physical condition of each individual. However, the recommendation is to start lightly and then gradually increase the effort. Initially, introduce short peaks of intensity and then, as you get better, lengthen them.
Conclusions
Recovering from injury takes time and dedication. Progressing gradually and at a slow pace, oddly enough, will make you improve faster. Listening to your body and not forcing it is essential to avoid moving backwards or even making the situation worse.
Designing an injury recovery workout can be difficult, which is why at BKOOL you can count on advice and routines based on your fitness level. Get back on the smart trainer safely without worrying about taking risks.
BKOOL is the most complete cycling simulator on the market, try it FREE for 7 days!
Strength tests are essential to understanding your cycling performance’s progress. Performing this test on the smart trainer provides very reliable data since no external factors influence the result. That is why today we are going to talk about the Ramp Test, one of the most popular tests on the smart trainer.
Why do you have to do a strength test?
Before explaining the Ramp Test, it is worth mentioning the importance of performing watts tests, as they allow us to know our FTP – Functional Threshold Power. This value is essential for effective training.
A well-defined FTP offers the possibility of establishing training sessions that are truly adapted to the cyclists’ characteristics, thus being more useful for improving performance.
What is the Ramp Test?
Performing a strength test on the smart trainer consists of doing a hard and demanding workout for about 20 minutes during which the intensity of the exercise is measured. The result of this test will dictate the cyclist’s evolution on the smart trainer.
In this case, the Ramp Test consists of a test in which the cyclist progressively increases the number of watts in intervals of between one and three minutes. The cyclist starts with a base wattage, increasing the intensity by 6 to 8% at each interval.
This test does not have a set time. The test ends when the limit is reached and the exercise cannot be continued.
How is FTP calculated with this method? By calculating 75% of your highest power reached in the intervals during the test. This will give a very accurate value.
Aspects to consider in the Ramp Test
It is important to note that before starting this test it is necessary to warm up for ten to fifteen minutes to avoid muscle pain or injury, especially in the legs.
As we have pointed out, the test ends when the limit is reached. However, one of the most common mistakes people make is to try to continue with the test even though there is hardly any strength left. This is counterproductive as it causes you to end up doing the exercise badly, ending up much more fatigued.
The Ramp Test can be performed on a regular basis to achieve an even more accurate result. With this test, we mainly improve our physical condition and our performance on the smart trainer.
Advantages of the Ramp Test
The main advantages of the Ramp Test are:
– It requires less time than traditional tests to perform.
– The pace factor does not influence its development.
– It is very accurate as it can be performed continuously.
The Coggan Test, an alternative to the Ramp Test
Although the Ramp Test is currently one of the most widely used for strength training on the smart trainer, there is another variant that is also very effective.
The Coggan Test is another good alternative that can be performed in twenty minutes – it is a shorter version – but only works depending on the type of competition we are going to perform.
Foto: BKOOL
This is done by performing a previousprotocol of several ascents and descents to then perform the twenty minutes of the test at the maximum possible performance. In order to carry out this test, you have to divide the test into a warm-up and a main part.
The main part of the test is composed of five minutes of maximum effort, five minutes of recovery, fifteen minutes of maximum sustained effort, and five more moderate final minutes.
Through these times you will obtain an average watt to be multiplied by a correction factor of 0.95 to give the watts threshold value.
Conclusions
The Ramp Test has become very popular among cyclists in recent years due to its accuracy. Performing this test in BKOOL is simple, as you can design it in the workouts. You will then know your FTP and will be able to set up training sessions adapted to your cycling performance.
BKOOL is the most complete cycling simulator on the market, try it FREE for 7 days!
High temperatures are undoubtedly one of the drawbacks when performing any type of sporting activity in summer, including those we do at home.
However, preparing for your training session correctly can help you deal with these summer conditions. That’s why today we’re going to give you some tips to get the most out of your training session on the smart trainer, without worrying about high temperatures.
Five tips for dealing with high temperatures on the smart trainer
1. Choose a cool and pleasant place in the house
Try to place your smart trainer in an area of the house that stays cool throughout the day. Choose the room where you will hardly feel the intense heat outside.
If, for example, your house has a cellar or basement, this is an ideal place to place your smart trainer and do sport. These areas of the house stay cool all year round, as they hardly get any sun.
In general, the living room is another area that withstands high temperatures quite well. This is because it is usually the largest room in the house and takes much longer to heat up than the rest of the house.
If you have a terrace, even a small one, you have the option of training there with your smart trainer as long as you do it in the less hot hours of the day. Ideally, you should do it either in the early morning or late afternoon.
2. Hydrate constantly
Hydration is a basic aspect when doing sports, regardless of the time of year. However, during summer this requires even more attention. It is important to keep yourself hydrated on a regular basis.
At BKOOL, we have talked on more than one occasion about the importance of hydration and the different types of drinks that we can have before, during and after training.
It is important that you should not only drink when you are thirsty. Ideally, you should drink a good sip of water every 15-20 minutes and drink between 500-750 ml in each session.
You can combine different drinks such as water or isotonic drinks, as well as having a fruit or vegetable smoothie after training.
3. Reduce the intensity of your workouts
High temperatures cause the body to tire earlier than normal, resulting in symptoms of fatigue and lack of oxygen. For this reason, it is recommended that under these conditions you reduce the intensity of your workout or the time it lasts.
Lowering the pace of training will allow you to finish the session without being excessively tired, being able to perform throughout the week at 100%.
4. Use a fan or air conditioner
If you have one of these devices, use it. They will help to keep your room cool over a longer period of time and you will not feel the heat during exercise.
However, do not blow the air too hard, as most colds that appear in summer are due to the excessive intensity with which air conditioners and fans are set.
Foto: BKOOL
5. Choose your sportswear wisely
It is important to choose carefully the clothes that you will wear whilst training. The purpose of sports jerseys and cycling overalls, among others, is to absorb sweat.
This type of clothing is made of hydrophobic fabrics which keep moisture away from the skin.
Therefore, try not to wear just any cotton T-shirt, as these are not prepared for sweat absorption, and not only will you feel hotter, but your skin will become irritated.
Conclusions
Plan your weekly training routine according to the temperatures which are forecast, taking into account the heat you will have to face. Follow these tips and stay hydrated both on and off the smart trainer and get on with your BKOOL training without the high temperatures being a major inconvenience!
BKOOL is the most complete cycling simulator on the market, try it FREE for 7 days!
Turning fifty is often associated with a reduction in physical performance in sport, but is this always the case? The passage of time can manifest itself in different ways, including in physical fitness, but can I enjoy indoor cycling past the age of fifty? Of course you can.
It is true that once you reach a certain age you don’t do sport in the same way, as there are more physical limitations. However, sporting performance also depends to a large extent on mentality. Those who have a more youthful personality and try to keep pushing themselves to the maximum, continue to get high quality workouts without age being an obstacle.
Perhaps you have wondered if after fifty you can continue to enjoy indoor cycling and the activities offered by BKOOL. This depends mainly on your mentality and your capacity for sporting demand. It’s inevitable to get older, but that doesn’t mean you have to give up sport and the desire to excel.
The way you age dictates your athletic performance
It is very common to hear comments such as “forcing so much is surely not good”, “at my age so much intensity is no longer good” and a long etcetera. However, these phrases are more of an excuse than a reality.
The factor that indicates how much sport we can do is not our age, but the way we age. It is true that turning fifty means starting to have certain limitations, but it all depends on how we are aging.
It is not the same to reach fifty years of age being overweight or having cardiovascular problems as it is to reach fifty years of age without having any health problems. Health, lifestyle, diet and sporting experience determine the way we age and, therefore, are the keys that determine sporting performance.
How to plan your training?
As we age, it is common to lose aerobic capacity. Therefore, this is an aspect that must be emphasized in training.
It is advisable to perform high-intensity training, but without overdoing it. The appropriate thing to do is to adjust the loads and reduce the time of the intervals, always as much as possible adapted to our aerobic capacity.
For this work, an example of training is HIIT (High Intensity Training), as it is designed to work aerobic capacity and oxygen consumption. However, it is not an exercise to be performed constantly. The demand is high, so it should not be performed more than twice a week.
Picture: BKOOL
However, it is possible to perform an extensive training, an average of two hours, performed at intensities close to 60% of VO2Max. This type of exercise is essential for developing endurance in cycling.
In the case of the anaerobic threshold, it is best to push yourself less. It is advisable to work with short intervals of about ten minutes, reducing the number of repetitions and lowering the intensity.
Loss of muscle mass after fifty years of age
In the same way that aerobic capacity begins to be lost, muscle mass is also reduced. In cyclists over 50 years of age it is essential to include strength training in the routine. This will minimize muscle loss.
This training can consist of more specific exercises for cycling such as squats, presses or those that work the extensor muscles of the lower body.
The frequency of strength training can be two days a week for six to eight weekswith medium and high loads. In the following months, training with fewer sets and medium loads can be performed.
Conclusions
Enjoying indoor cycling past the age of fifty is a reality for many athletes who have not given up their hobby. The factor that determines physical performance is how you age, rather than your age, so don’t give up your training on the smart trainer.
The key is to train your aerobic capacity and include a strength routine to minimize muscle loss. Continuing to play sports helps you age even better, healthier and slower.
BKOOL is the most complete cycling simulator on the market, try it FREE for 7 days!
This website uses cookies 🍪
Cookies on this website are used to personalize content and ads, provide social media features, and analyze traffic. We also share information about your use of the site with our social media, advertising, and analytics partners, who may combine it with other information you’ve provided to them or that they’ve collected from your use of their services.
Functional
Always active
Storage or technical access is strictly necessary for the legitimate purpose of allowing the use of a specific service explicitly requested by the subscriber or user, or for the sole purpose of carrying out the transmission of a communication over an electronic communications network.
Preferences
Technical storage or access is necessary for the legitimate purpose of storing preferences not requested by the subscriber or user.
Statistics
Storage or technical access that is used exclusively for statistical purposes.Storage or technical access that is used exclusively for anonymous statistical purposes. Without a requirement, voluntary compliance by your Internet service provider, or additional records from a third party, information stored or retrieved solely for this purpose cannot be used to identify you.
Marketing
Storage or technical access is necessary to create user profiles to send advertising, or to track the user on a website or several websites for similar marketing purposes.
 Go to BKOOL